Fast Deployment of an Image Classification Web App with fast.ai
- Paul Carter, PhD

- Feb 26, 2020
- 9 min read
Updated: Jan 12, 2021
Medium Post: https://medium.com/@paul.m.carter1992/fast-deployment-of-an-image-classification-web-app-with-fast-ai-14d0bac48ae7
I have recently been looking into more application of deep learning and came across a course which promotes the respective library of fast.ai. The premise behind fast.ai's implementation is to enable for easy and rapid development of state-of-the-art deep learning models and to achieve this they pre-wrap functionality to process data and apply deep architectures written in PyTorch.
The library offers powerful potential and allows for the promotion of creativity in application beyond development of the model. Intrigued by the ability of the library to allow for quick development and deployment I wanted to develop an end-to-end image classification project. For this project I decided to build an image classification web app around the classification of common British birds.

The principle of multi-class image classification is to with some measured degree of certainty be able to assign a class to an image based on features within the image. As we will see later on the use of convolutional neural networks are key to providing this ability because connected layers of convolutional filtering allow the model to decompose and understand more and more complex shapes and features.
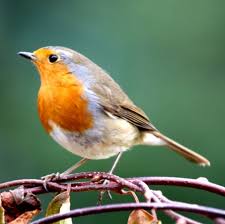
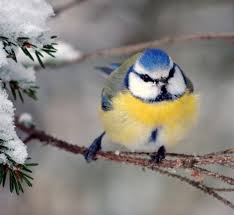
Before we get to modelling though we have to collect a dataset from which the neural network can train and validate against. The first question was; how many different varieties of bird do we want the model to be able to classify?. The larger the number of classes that the model would have to differentiate between the more challenging the training of the model would be. In the end I used this article from lovethegarden.com to motivate the use of 19 common British birds which one could find in the garden. The birds we attempt to classify are: Robin, Collared Dove, Great Tit, Goldfinch, Chaffinch, Wood Pigeon, Blackbird, Starling, Blue Tit, House Sparrow, Magpie, Carrion Crow, Jay, Wren, Goldcrest, Dunnock, Coal Tit, Long-Tailed Tit and Greenfinch.
During the fast.ai course they show a useful way of extracting image URL lists from Google Images which can be then used to bulk download sets of images for different classes.
Go to images.google.com
Use to search for images of a given class
Press Ctrl+shift+j to pop up javascript console (Cmd+option+j for Mac)
Type this in the console: urls = Array.from(document.querySelectorAll(’.rg_di .rg_meta’)).map(el=>JSON.parse(el.textContent).ou); window.open(‘data:text/csv;charset=utf-8,’ + escape(urls.join(’\n’))); and hit enter key.
It will pop up download box, choose the directory you want to save, type name of the text file and hit enter.
It will save all URLs of images you chose to download later in the text file on your computer.
This method can be used to generate CSV files with a list of image URLs to download. Within a Jupyter Notebook we can then download all the images within the specified CSV.

Once all the images had been downloaded there was a need to clean them. If you just go on Google Images and search anything and look at all results in the first 80 there will be some which are of related things but not the specific subject matter. With British birds annoyingly then you search for one many of the other classes appear alongside (especially the same Robin in every different search). These need to be removed because the neural network will be trained and validated against the dataset that is provided and will therefore learn to misclassify. The old machine learning moto holds true here garbage in, garbage out!
Once I had worked through all the downloaded images and ensured that I had minimised misclassification we had 1024 useable images across the 19 classes and it was time to use fast.ai to generate the image classification model. The notebook which was used to train and validate the model is given here and hosted on Kaggle. I chose to develop my model here because deep learning models require to take full advantage of GPU access to train efficiently. This meant using a cloud service - AWS and Google Cloud were both options but both cost for GPU time. Kaggle happily gives people 30hrs/week of GPU time for free to develop on (which was more than enough).
To load in all the images within the bird images directory you provide the path to a ImageDataBunch class. This was set up to use the structure of the directory, which had been segmented into subdirectories for each class, in order to assign a target string. Other parameters parsed to the from_folder function for building the DataBunch is valid_pct which randomly splits of 20% of the entire image set for validation purposes. It is important to leave the images in the validation set completely out of the training procedure to ensure we do not let any data leakage contaminate assessment metrics. Before generating the ImageDataBunch the numpy random seed was set to ensure consistent validation splitting during development.

The size parameter defines the square size that each image is cropped to - this is important because the model to be developed will use Transfer Learning on an existing deep model which was originally trained on images of this size. The normalise function is used to apply the same statistical scaling of pixel values as was applied during the original neural network development on the ImageNet dataset.
The DataBunch object can be randomly sampled to a selection of our feathery friends who we are trying to classify.

The great thing about developing an image classification deep learning model is that you can leverage transfer learning to take advantage of already pre-existing powerful tools. Convolutional neural networks use a deep layering of convolutional filter layers to extract progressively more complex image features. This means that irrelevant of the target case the initial layers of the networks will always locate simple features like edges and gradients. What this means is that a model such as ResNet34 which was built to compete on the ImageNet challenge dataset (classify 1000 different objects) has already been trained optimally to build up general image features even up to some of the very last layers. A good summary post about the architecture of ResNet34 is given here and more information can be found below. We can take advantage of this and re-purpose the final layers and output to our specific problem. Then by unfreezing the previous layers and training with a discriminative learning rate schema we can tailor the entire CNN to our purpose.

ResNet34 Convolutional Neural Network (CNN)
The ResNet style CNN uses skip connections to allow gradients to flow from later points in the architecture back to initial layers, this allows for a solution to the vanishing gradients problem - when networks become too deep the gradients from the loss function can vanish to zero.

The architecture of the ResNet34 model is based around an initial convolutional layer followed by multiple blocks of stride-1 convolution kernel (3x3) layers separated by layers which use stride-2 kernels to compress the dimensionality across the network which allows for a subsequent doubling of kernel number. Each block of the ResNet comprises of a number of layers which repeat an operation sequence of convolution -> batch normalisation -> ReLU activation. The skip connection parse between every two layers of this operation sequence.
Initially in the architecture the Conv1 block applies a larger 7x7 convolutional kernel -> batch normalisation -> max pooling (3x3) with stride-2 which sets up for the subsequent ResNet blocks as described above which compress the information from the RGB image of size 224x224 (rank-3 tensor 224x224x3) to (7x7x512). The network then is compressed using average pooling before being passing through a fully connected layer of size N where N is the number of classification classes. Appending a softmax activation layer then allows for a binary multi-class model to be created.
For the original ImageNet problem N=1000 for the final fully connected layer however when applying transfer learning this has to be initially changed to conform to the problem at hand which in this case is N=19. This is the reason that training proceeds in an (at least) 2-stage manner. The initial stage holds weights for the final fully-connected layer and trains just this fully-connected. Only after this do we provide freedom of earlier convolutional layers under a discriminative learning rate schema.
The ResNet34 model can be downloaded and set up in a CNN learner model object as above and also a set of metrics given to track during fitting. These metrics of accuracy and error_rate are assessed purely on the held-out validation dataset and are in addition to the standard loss function of binary cross-entropy which will be tracked for both training and validation set.
Let's start training! Initially the training will be on the frozen model and so only the very final layers are being left available to optimise. The model undergoes initially 4 epochs of fitting under the one cycle policy (Smith et al. 2018; more here). This allows us already to provide an accuracy on this 19 types of bird classification problem of 87%.

The next stage is to now unfreeze the rest of the layers of the model and perform some additional training. Fast.ai comes with a learning rate finder tool to help identify good inputs for a discriminative learning schema - different depth of the model are trained with different learning rates because the initial layers do not need as large tweaks. Running the learning finder runs over a range of learning rates and produces a loss curve. From here a learning rate range in the steepest portion before the minimum are chosen to allow for efficient training. The lowest layers of the network are trained with a learning rate a factor of 10 lower and in our case a range of [5e-5, 5e-4] was chosen.

Using the located learning rate range the unfrozen CNN is trained using the one cycle policy for 30 further epochs. A model callback is parsed to the training method to continually save the model with minimal validation set error rate. This callback allows us to run for a large number of epochs but reduces the chance of overfitting because once the model begins to not generalise well the validation error rate will begin to increase.

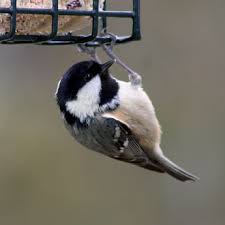
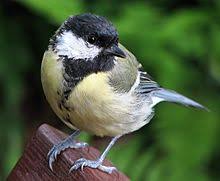
With this additional fine-tuning of the earlier layers in the CNN the optimal accuracy for our model achieves 92%. Digging further we can look at the confusion matrix to understand pain points of the model and common mis-classification occurrences.

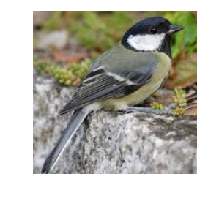
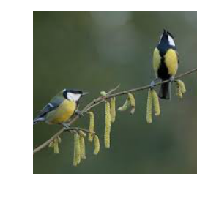
Interestingly there are two obvious places that the model struggled to get a reliable classification which was on distinguishing between, Coal Tits and Great Tits, and, House Sparrows and Dunnocks. Below I show images of each of these pairings and it becomes clear why the model struggles with distinguishing.


We have trained the model to a satisfactory level to deploy into a web app. In order to host the model we store as a pickled file which can be stored on Google Drive.

Once we have saved the file and sent over to Google Drive the model was hosted through a site called Render. To deploy the model was very simple through this service and required the following steps:
Clone the Github repo that fast.ai had set up for hosting on render.
Edit the server.py file in app/. Replace the pickled model name with that stored on Google Drive and insert a Google Drive link which is generated from the shareable link and a personal Google Drive API credentials. The generation of this key can be performed here.
Change the app/view/index.html file to customise the look of the web app.
Once the repo had been edited locally it was pushed back up to my GitHub repo.
Link your GitHub repo to Render and deploy the application.

Just like that we can surface our image classification deep learning model to a web application endpoint from which anyone can access and request a classification - the URL for this web application is https://common-british-bird.onrender.com*.
*The website server costs $5 a month to run on so if it is not available I may be using Render to run a different server.

Here is a clip of the web app in action:
We can use the libraries hook features to interrogate the trained models final layer to understand the region of selected images which activate most strongly. This is a really useful tool as it provides a direct way to validate that the CNN is focussing on the important part of the image and provides insight into regions of high information.
The final layer of the ResNet34 model used contains a 7x7x512 rank-3 tensor, with the 512 corresponding to the dimensionality built up by different kernel application. Each of these have captured different complimentary information about the image which is used in the final classification. The hook functionality is used to abstract the activations on this final layer when apply on one of the images from the dataset. By averaging over the 512 kernel layers one is able to obtain an aggregated view of the regions of highest activation in the image.


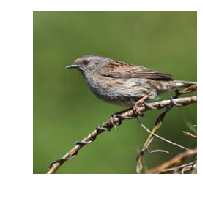

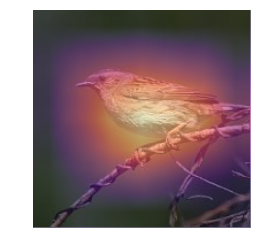


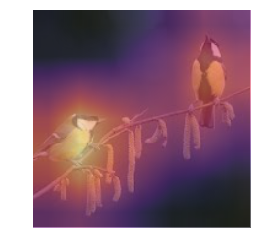
This is a great way to visually inspect regions of the image that the CNN is activating in and seems to correlate well with the subjects in question, even in the non-trivial case of two subjects within the same image.
This project was lots of fun and the fast.ai library provides a great tool to build and deploy powerful deep learning models efficiently. Leveraging transfer learning on a pre-trained ResNet34 CNN provided 92% accuracy on a 19-class image classification problem. The model was rapidly deployed once trained on a web application through the Render service and was able to provide predictions in production. By interrogating the final activations in the neural networks architecture a granular view of what in the image the model is sourcing information from can be obtained and in future could be used to provide opportunity for further iteration. Kaggle notebook for exploration and model training: https://www.kaggle.com/pcarter/fast-ai-image-classification-british-birds


Comments